How to set up and file T3/FX Federal slips in ProFile
by Intuit• Updated 3 months ago
Table of contents:
 ↳
↳ Enter transmitter information
Note: You’ll need to enter filing credentials (RepID or Transmitter Number) for each of the three submission methods (RAC, MyBA, WAC)
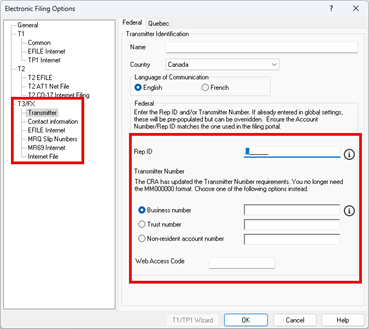
- Open ProFile.
- Select Options... from the EFILE dropdown menu. The Electronic Filing Options window will display.
- Select the Transmitter option under the T3/FX section.
- Complete Transmitter name, country, RepID or a Transmitter Number
Note: Customers can use either a WAC number to file with the above information or a RepID if they’re filing as a preparer (more explanation is available in the “Enter filing credentials” below)
A transmitter number beginning with MM is no longer used for FX or T3 transmissions. Instead, a registered Business Number/Trust number/Non-resident account number is needed. In some cases, a Rep ID will be needed.
- You now only need to enter your Web Access Code (WAC) at the CRA portal. There's no need to enter it in the software.
- Select Contact Information option under T3/FX section. Fill in contact information, phone number, email address.
- Select OK.
Transmitter settings by submission method
Tax slips can be submitted to the CRA three different ways. Below are steps to set the correct transmitter settings based on the following submission method.
Represent a Client (RAC)
When filing federal slips through your Represent a Client portal, you will only need to provide your RepID in the T3/FX Transmitter information. The XML file will omit the Transmitter BN field and contain the other required information to submit the slip successfully.
My Business Account (MyBA)
If you’re new to filing via your My Business Account, the CRA has an article on how to submit this way in the General Recommendations section of the Internet File Transfer (IFT) Reference Guide.
Select EFILE and then Options from the top toolbar. Under the T3/FX, Transmitter section, enter either the BN15 or BN9 that'll be used to access MyBA. Depending on what type of slips you’re filing, will determine which format of Business Number you use as described below in the Examples of Business Numbers for the Purposes of Filing.
Internet file transfer using WAC
Your firm can request a WAC code. If you have a WAC code for your firm, enter your 15-digit Business Number and WAC code in the EFILE, T3/FX Transmitter section. This allows you to to file for all your clients through CRA’s Internet File Transfer system.
If you are an internal accountant or have limited companies you are filing for, you can change the information in this section to be the client’s 15-digit Business Number, Trust Number, or Non-resident Account Number. The WAC code is optional in these settings and for your own records.
Examples of business numbers for purposes of filing
Note: The business number used for filing should contain 9 numbers, followed by two letters (RP for Payroll Account Number, as an example), followed by four numbers, 0001 (most common), 0002, or 0003.
| Slip type | Business number |
| T4A | Payer's Account Number: Required, 15 alphanumeric, 9 digits RP 4 digits, example: 000000000RP0001 |
| T5 | Account Number: Required, 15 alphanumeric, 9 digits RZ 4 digits, example: 000000000RZ0001 |
| T4 | Payroll Account Number: Required, 15 alphanumeric, 9 digits RP 4 digits, example: 000000000RP0001 |
- If you file different types of slips, you will need to change the business number in Electronic Filing Options when filing a different slip type than the last.
- You will need a different WAC for each business number of a client. The WAC for a RP filing (T4/T4A) will be different than the WAC for the RZ filing (T5).
Generate and submit slips to the CRA
Note: Only current-year slip filing is supported in Profile at this time.
Select the type of filing you are continuing with.
Internet file original federal slips
- Open the FX return in ProFile.
- Make sure there are no outstanding errors under the Mag Media auditor tab.
- Navigate to the information (Info) form of the return.
- Select Yes to the question “Are you internet filing slips?”
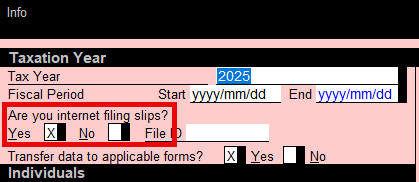
Note: The option to internet file slips won't appear unless this option is set to Yes.
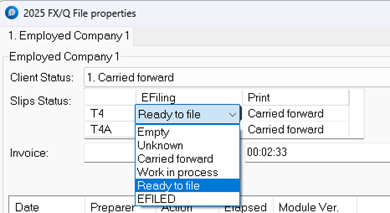
- Select the Properties option from the File dropdown menu.
- Review the Slips Status section under the EFiling column. Set the slip status of the slip type you are filing to Ready to file.
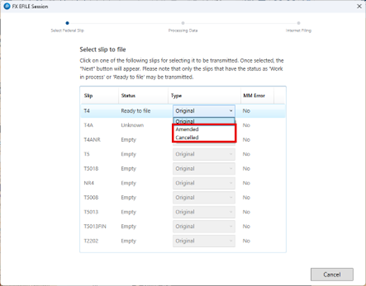
- Select the Transmit Federal slips or a T5013 return option from the EFILE dropdown menu.
- Select the slip that is set with the Ready to File value.

- Select Next. If you don't see Next, check again if there are MM errors in the auditor. The XML file builds after selecting Next.
- The following screen displays the location of the generated XML file.
- If you are submitting the XML to CRA using Represent a Client (RAC) or My Business Account (MyBA), you can exit this EFILE session and continue with the XML file submission on CRA’s RAC or MyBA pages.
- If you are using CRA’s Internet File Transfer using WAC, continue with the steps below.
- Read the disclaimer and select I agree to give consent for the XML transmission.
- Enter the Account number and Web access code on the CRA portal page. Select Sign in.
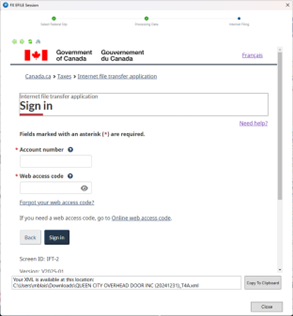
Note: Due to changes in CRA requirements, the account number must be manually entered. It must match the number used to build the XML file in the Electronic Filing Options window.
- Follow CRA’s instructions to upload the XML.
- Review the T619 verification page, and then select Submit.
The XML file will be transmitted to the CRA. We recommend printing the confirmation you receive.
Internet file amended and cancelled Federal slips
- Open the FX return in ProFile.
- Navigate to the Info form of the return.
- If changing, make the necessary amendments to the slip. If cancelling, don't change the amounts on cancelled slips, a cancelled slip should retain the original amounts filed to the CRA. The CRA will make the necessary adjustments and cancel the amounts.
Note: for each slip, mark them as A Amended or C Cancelled in the report code section.
- Select Yes to the question Are you internet filing slips?
Note: The option to internet file slips doesn't appear unless Yes is selected.
- Select the Properties option from the File dropdown menu.
- Review the Slips Status section under the EFiling column. Set the slip status to Ready to file.
- Select the Transmit slips or a T5013 return option from the EFILE dropdown menu.
- Select one slip that is set with the Ready to File value. There must be no MM errors, otherwise you won't see the NEXT option.
- Set the value in the Data Type dropdown menu to Amended or Cancelled.
- Select Next. You get a notice that your return is being processed.
- The CRA transmission window automatically displays. Read the disclaimer and select I agree to give consent for the XML transmission.
- Enter the Account number and Web access code, and then select Next.
Note: Due to changes in CRA requirements, the account number must be manually entered. It must match the number used to build the XML file in the Electronic Filing Options window.
You'll receive a confirmation. We recommend that you print it.
Changing the location of all XML generated files
- Select Options... from the EFILE dropdown menu. The Electronic Filing Options window will display.
- Select the T3/FX option.
The current location for XML files is listed under the XML Directory section.
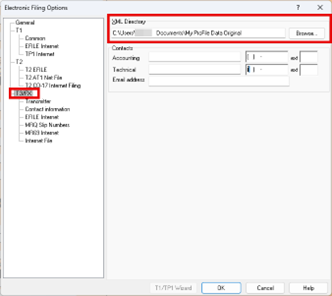
- Select Browse and navigate to the new location for XML file storage.
- Select OK.
The new location is saved.