Perform a clean uninstall of ProFile
by Intuit•1• Updated 7 months ago
To resolve some errors, it may be necessary to perform a full (or "clean") uninstall of ProFile. Follow the steps below to complete this task:
| ‣ Step 1: Uninstall programs |
| ‣ Step 2: Remove PDF Export print device |
| ‣ Step 3: Manage the Windows registry |
| ‣ Step 4: Rename files |
| ‣ Step 5: Finish the install |
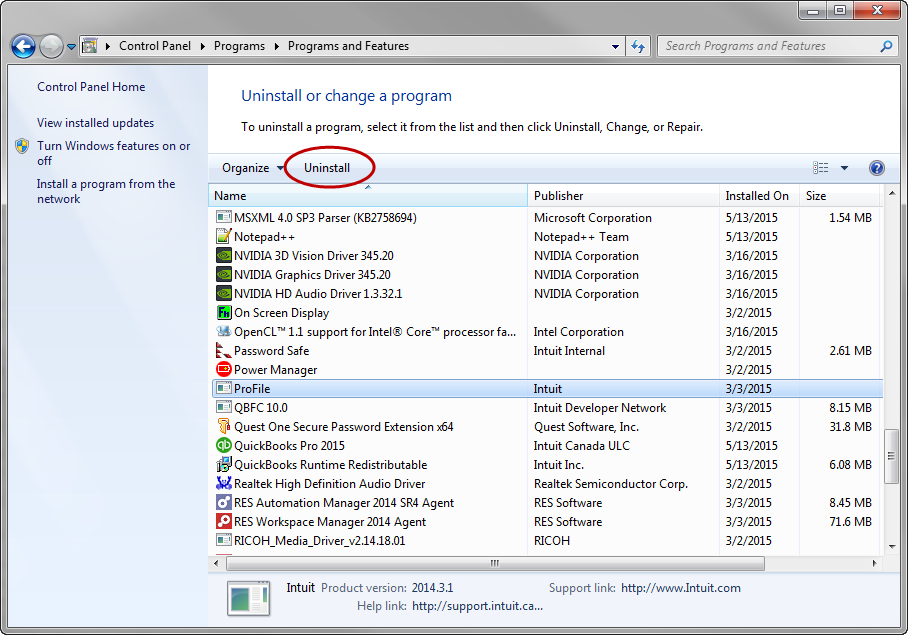
Step 1: Uninstall programs
- Open the Windows Control Panel.
- Enter the term, programs and features in the search bar in the top-right corner. Press Enter and select the top result displayed in green text.
- Identify the following programs:
- ProFile
- QBFC10
- Select each program, and then select Uninstall. The programs uninstall.
Step 2: Remove PDF Export print device
- Open the Windows Control Panel.
- Enter the term devices and printers in the search bar in the top-right corner, and then press Enter. A list of devices and printers displays.
- Right-click on the ProFile PDF Export printer option and select Remove device.
Step 3: Manage the Windows registry
Note: Undertake the following steps carefully when working with the Windows Registry.
- Click the Windows icon in the bottom-left corner of the screen.
- Enter the term regedit in the search field. The regedit.exe file lists in the window.
- Select regedit.exe; the Registry Editor window opens.
- Select Export from the File dropdown menu in the top toolbar.
- Select Desktop from the left-side menu as a destination for the file backup.
- Assign a name of Backup in the File name field.
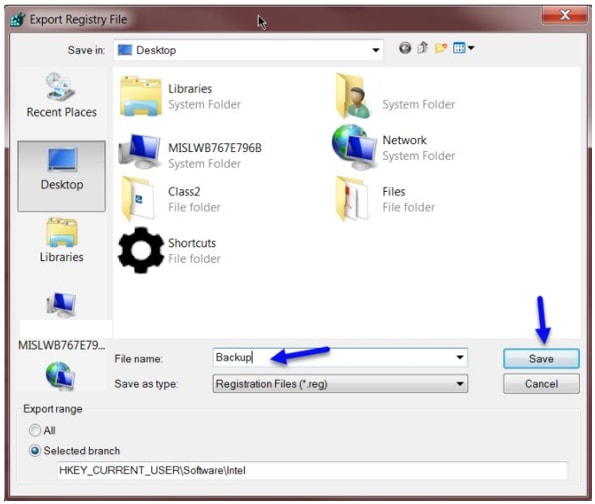
- Select Save. The backup file saves to the desktop.
- Navigate to the location HKEY_CURRENT_USERSoftwareGreenPoint.
Note: If there is no GreenPoint registry, close the Registry Editor window and proceed to Step 4.
- Identify the GreenPoint folder.

- Right-click on the GreenPoint folder and rename it as GreenPoint_old.
- Close the Registry Editor window.
Step 4: Rename files
- Rename each of the following folders to have the suffix -old. This will force ProFile to generate a new replacement folder.
- You will need to enable the Show Hidden Files option. This option is under the View menu on the File Explorer.

- C:\Users\%USERNAME%\AppData\Local\GreenPoint-old
- C:\Users\%USERNAME%\AppData\Roaming\GreenPoint-old
- C:\Users\%USERNAME%\AppData\Roaming\ProFile-old
- C:\Users\%USERNAME%\Documents\ProFile-old
- C:\ProgramData\GreenPoint-old
By default, ProFile data is stored in a folder called C:\Users\%USERNAME%\Documents\My ProFile Data. So unless you moved your files into one of the above folders, this will not affect your data.
- Open the Windows Task Manager.
- Identify the process ProFile AutoUpdate Host (32 bit).
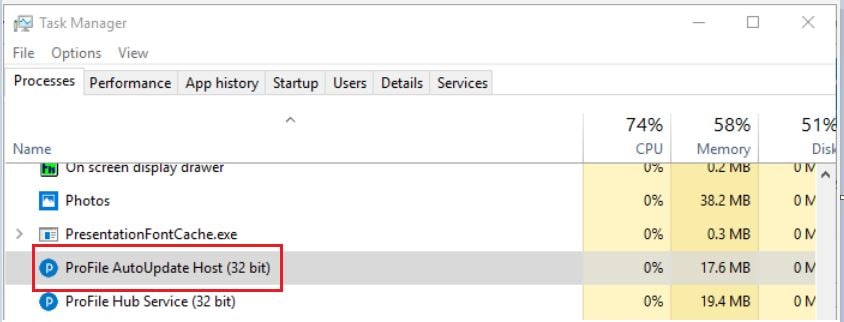
- Select the process, and then select End task. The process will end.
- Rename the following file in the same folder as those renamed above:
C:\ProgramData\Intuit\AutoUpdate-old
Step 5: Finish the install
- Close all windows.
- Restart the computer.
- Rename the following folder:
C:/Program Files (x86)/ProFile to C:/Program Files (x86)/ProFile-old
Note: Don't rename the Program Files (x86) folder.
- Reinstall ProFile. The latest installer file can be found here.