Please be aware: An internet connection is required to download, install, and activate ProFile. In addition, you must have administrator rights for the computer you wish to install ProFile on.
Step 1: Download ProFile (file size approximately 2073 MB, named "gpsetup.exe")
Your web browser may ask you to confirm if the file download can proceed; click “Yes” or “OK” when prompted. If prompted to select a location to store the installation file, we recommend your computer’s “Desktop” or “Downloads” folder, or another easy-to-find folder.
Step 2: Install ProFile
Locate the “gpsetup.exe” installation file that was saved in a folder:
Double-click the file to begin the installation. If you are using Windows, right-click the file and select the “Run as Administrator” option.
Follow the dialogue boxes when prompted to install ProFile.
Step 3: Activate ProFile
Double-click the ProFile icon installed on your computer:
When the program opens, you are prompted for your product codes. You can find your product code and license key information on your purchase receipt. Enter your “Product Code” and “License Key”.
Click “Add another license” to add more licenses, if necessary. If you have purchase additional licenses for a module, enter the “Product Code” and “License Key” only once on each additional computer.
Click the “I’m Done” button after all product codes have been entered. Activation may take a few minutes to complete. ProFile displays a message asking to the Internet to determine if you are using the most current version of the software. You can skip or delay this check, or click the “OK” button to proceed with the check.
That’s it! You have successfully installed ProFile.
Need some help?
You can review our Help article describing the download, install, and activation process. This article includes more in-depth information and troubleshooting material to assist you in the event of any problems.
Please be aware: An internet connection is required to update ProFile.
Step 1: Update ProFile to the Latest Release
Open ProFile.
The activation window displays; close the window.
The QuickStart window displays; close the window.
Select the “Check for Updates…” option from the “Online” toolbar menu.
ProFile checks for updated versions and offers you the chance to update, if necessary.
Select the “OK” button to update if offered the opportunity. This will ensure you are using the most-recent version of ProFile.
Step 2: Add New Licenses
Select the “Manage Licenses” option from the “Help” toolbar menu.
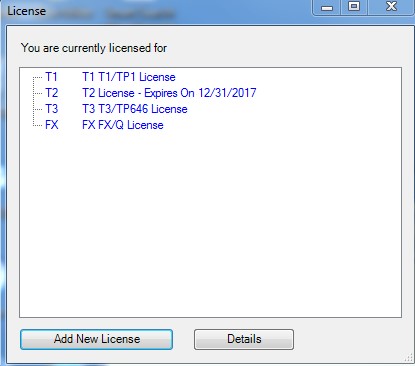
A list of modules displays:
Click the “Add New License” button.
Enter your new “Product Code” and “License Key”. You can find your product code and license key information on your purchase receipt.
Click the “Activate” button; the modules you have purchased are activated.
Note: If you've purchased additional licenses for a module, enter the "Product Code" and "License Key" only once on each additional computer.
That’s it, you’ve activated ProFile!
Need some help?
You can review our Help article describing the download, install, and activation process. This article includes more in-depth information and troubleshooting material to assist you in the event of any problems.
Please be aware: An internet connection is required to reinstall ProFile.
Did you reformat the hard drive and install the new OS from a disk or USB?
Note: if you have the opportunity, it is best to remove the existing license prior to reformatting the hard drive. If you reformatted the hard drive and installed the new OS from a disk or USB, uninstall and reinstall ProFile and re-enter product code and license key.
The product code and license key can be found in your email or phone receipt.
Related Link: Downloading, Installing, and Activating ProFile
Did you update the OS using the Windows upgrade feature?
Note: if you have the opportunity, it is best to uninstall Profile, upgrade the OS using the Windows feature, and then reinstall and reactivate ProFile.
Using the Windows OS upgrade feature does not impact the installed ProFile software, but there is a risk the license key/product code and the PDF export printer driver may be deleted.
Re-enter product code and license key if it was deleted while updating the OS. The product code and license key can be found in your email or phone receipt.
Reinstall the PDF printer driver if it has been deleted; this happens to some customers during the Windows upgrade. The “Amyuni 550” print driver is the most common driver option.
Related Link: Updating/Installing the Amyuni 550 printer driver
Install ProFile on the new computer.
Related Link: Downloading, Installing, and Activating ProFile
Re-enter your existing product code and license key when prompted. The product code and license key can be found in your email or phone receipt.
Copy any saved ProFile files from the old computer to the new computer, if necessary.
Existing returns can be transferred from an old computer to a new computer by the use of removable media device (e.g., a USB stick).
Insert or attach the media device to the old computer.
Locate the folder "My ProFile Data" directory on the old computer. The default directory path on a Windows 10, Windows 8, and Windows 7 machines is:
C:\Users\[USER NAME]\My Documents\My ProFile Data
Copy the "My ProFile Data" directory from the older computer to the media device.
Insert the media device into the new computer and copy the "My ProFile Data" folder to a new file directory.
Answer "Yes” to all questions when prompted to overwrite any existing material.
Please contact our ProFile support group if you have lost your license key or code information.
ProFile support hours are from Monday to Friday, 9:00 a.m. to 6:00 p.m. EST.
Toll-free Support Line: 1-800-452-9970
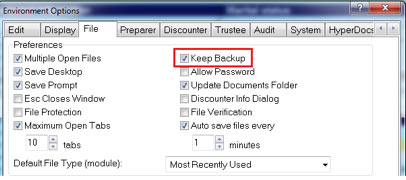
ProFile includes a feature called “Keep Backup”. This feature allows users to store a backup file of their ProFile files in case of a file corruption or loss.
Select the “Environment…” option under the “Options” drop-down menu.
Select the “File” tab:
The default location of these backup files is C:\Users\[USER NAME]\Documents\My ProFile Data\ [MODULE TYPE]\BackupFiles
If this feature has not been activated the existing ProFile data/returns/files are lost.
Please be aware: An internet connection is necessary to purchase and use a OnePay license.
Step 1: Update ProFile to the Latest Release
Open ProFile.
Select the “Check for Updates…” option from the “Online” toolbar menu.
ProFile checks for updated versions and offers you the chance to update, if necessary.
Select the “OK” button to update if offered the opportunity. This will ensure you are using the most-recent version of ProFile.
Step 2: Open the Return
Select the “Open…” option from the “File” toolbar menu
Locate and open the return that you want to file.
Step 3: Purchase the OnePay License
Select the “star” icon from the toolbar menu in ProFile or select the “OnePay Upgrade…” option from the “File” top toolbar menu.
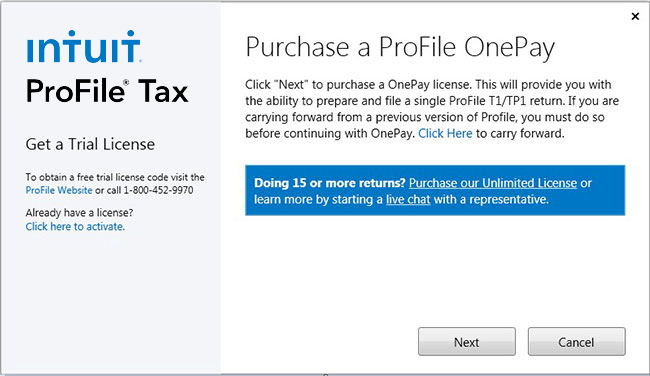
The OnePay payment wizard displays:
Follow the steps as prompted to purchase a OnePay license; a credit card is required to complete the purchase.After payment is completed you can file the return.
Need some help?
You can review our Help article describing the download, install, and activation process. This article includes more in-depth information and troubleshooting material to assist you in the event of any problems.
Step 1: Download ProFile (file size approximately 1557 MB, named “gpsetup.exe”)
Your web browser may ask you to confirm if the file download can proceed; click “Yes” or “OK” when prompted. If prompted to select a location to store the installation file, we recommend your computer’s “Desktop” or “Downloads” folder, or another easy-to-find folder.
Step 2: Install ProFile
Locate the “gpsetup.exe” installation file that was saved in a folder:
Double-click the file to begin the installation. If you are using Windows 8 or Windows 7, right-click the file and select the “Run as Administrator” option.
Follow the dialogue boxes when prompted to install ProFile.
Step 3: Start ProFile
ProFile opens.
Step 4: Open the Return
Open a new return (“File” -> “New” from the top toolbar) or carry forward an existing return (“File -> “Carry Forward…”).
The OnePay payment wizard displays:
Step 5: Purchase the OnePay License
Follow the steps as prompted to purchase a OnePay license; a credit card is required to complete the purchase. During the payment process you will be provided with an embedded license that allows the return to be filed.
When the “Checkout” receipt displays, click on the “close this window” link at the top of the window. This saves the license into the return and embeds the OnePay license.
You can now work on and file the return.
Need some help?
You can review our Help article describing the download, install, and activation process. This article includes more in-depth information and troubleshooting material to assist you in the event of any problems.
Terms, conditions, pricing, special features, and service and support options subject to change without notice.