Change my print copies in ProFile
by Intuit• Updated 7 months ago
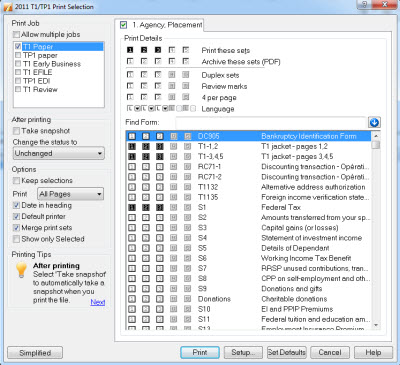
To print a different selection of forms, or a different number of copies (sets) for a particular client file, make changes to the default settings when you select Print from the File drop-down menu in the top toolbar.
1. Click [Advanced >>] to display the columns for manual form selection.

2. In the top row (Print these sets), select each set/copy you want to print (1-5). The number of boxes selected (black) is the number of copies you will print. For each set, in the column below, you can choose to include or exclude certain forms. By default, set 3 includes all the forms required for filing with the CRA or a provincial ministry.
To change the default selection of forms, or choose a different number of copies (sets) for all client files, make changes under the Form Selection option under the Options drop-down menu in the top toolbar.
By default, ProFile will automatically select the forms and copies that need to be printed. Use Options > Form Selection to change the copies or forms that print for all your client files. Here is what you need to do to change the default settings:
- Go to Options > Form Selection.
- Click on a module tab to customize the print jobs for that module.
- Choose one of the pre-defined print jobs from this drop-down list.
- Choose which copies (sets) of your files you would like to print by selecting (making black) or clearing (making white) the boxes next to the Print sets row.
Note: Set number 3 automatically includes all the forms you need for filing with the CRA or a provincial ministry. We recommend you do not change the selection in set 3.
The print job can include up to five sets of forms (copies of the file). The number of checkboxes selected in the Print these sets row will determine how many copies you print.
The rows at the top determine the format of the forms you include below. The modules have different features you can activate in the columns above the form list. The Print sets row selects the standard facsimile copies. Four per page reduces the size to save paper. For ProFile T2, you can create an RSI form set. ProFile TP1 includes an alternate language option.
Combine a selection in Print sets with a feature selection below, like 4 per page, Review marks, or for ProFile TP1, alternate language printing.
5. Name your print sets in the top right-hand corner of the dialog boxue (under set names).
Note: On File > Print > Print selection, you can set the option to Merge print sets. ProFile will then collate sets of the same name when you print multiple print jobs. For example, your CT23 print job may have a Client set, and your T2 only print job can also have a set called Client. Select Merge print jobs when you print both jobs in the same session. ProFile will print all the Client form copies together.
6. Choose which forms you want the form selection included with each set. For example, for ProFile T1, you may not wish to include the Keying Summary in the set for your client or your office.
You can manually change the list by clicking on form copy boxes with the mouse. With your keyboard, highlight a form name and press numbers 1 through 5 to select/clear the form selection checkbox.
If a particular form has no checkmark in any of the active set columns (on Options > Form Selection), ProFile will never automatically select the form to print, even if it does contain data in the client file. For this reason, form selection for each print job should always reflect all the forms you would like to print if they are used in a client file.
For more information, search ProFile Help under the Help menu using the keyword print.
More like this