Export ProFile data into Excel with Classic Database
by Intuit• Updated 7 months ago
Use the Export feature to work with ProFile data in another program. For example, you can add ProFile customer names and their EFILE/Print status to a text file. This file can then be added to another program to analyze or create a report.
Below is information to help get you started:
| ‣ Export to Microsoft Excel using the Classic Database |
| ‣ Deleting a field |
| ‣ Organizing the order of fields |
| ‣ Exporting data |
| ‣ Reviewing the exported data |
Export to Microsoft Excel using the Classic Database
- Open ProFile.
- Choose Export from the Database menu. The Export window will appear.

- Select Index. The File Index window will display.
- Select Browse and locate the location where the customer files are stored.
- Select the folder containing the customer files, and then select OK. The file path will display in the field.
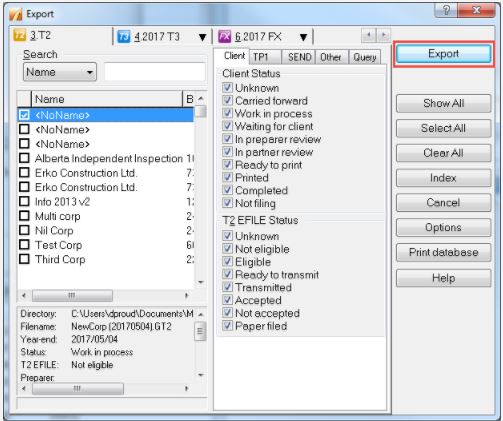
- Select OK. The customer data will populate in the Export window.
- Choose Select All to select all client data. To unselect specific customers, uncheck the box associated with the client name.

- Select Options. The Export Options window displays.
- Select Add. The Select Field window will display.
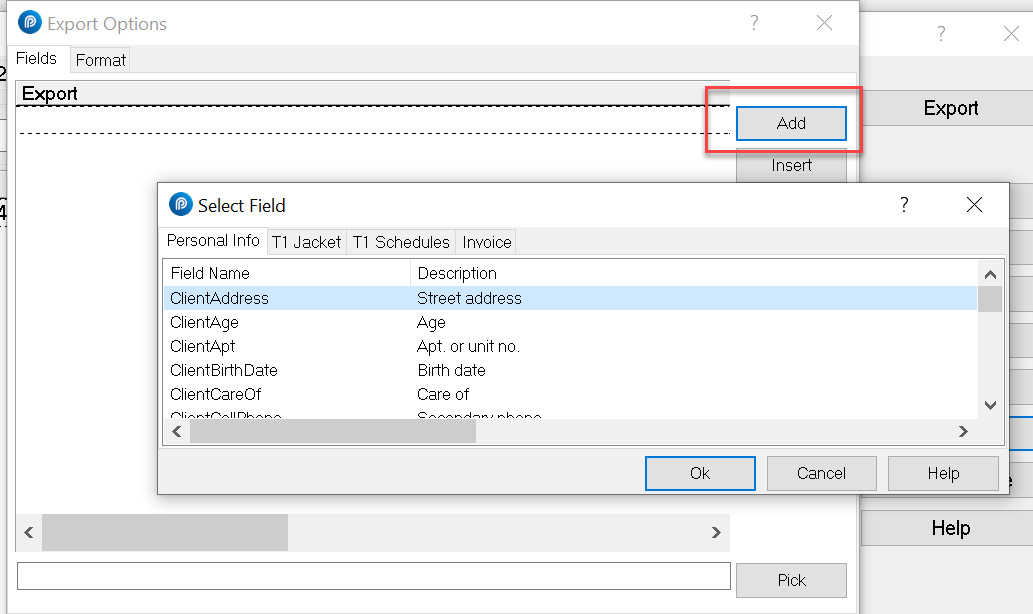
The following forms are available to select fields from:
- Personal Info
- T1 Jacket
- T1 Schedules
- Invoices
- Navigate to the desired heading. The available fields for export are listed within the heading.
- Select the field for export.
- Select OK. The field is added to the Export Options list.
- Repeat the selection of headings and fields as required. The selected headings and fields will be exported from ProFile.
Note: In some cases the specific desired field isn't listed in the Select Field list. In this case, select Pick in the Export Options window. Add fields as necessary.
In the case that the specific desired field cannot be found in the Add or Pick list, enter the field code manually in the Export Options window.
Deleting a field
If a field is not required for export:
- Select the field in the Export Options list.
- Select Delete. The field will be deleted from the list.
Organizing the order of fields
- Select an individual field listed in the Export Options list.
- Select the Up or Down arrow to move the selected field up or down in the order of fields.
This order is reflected when the data is exported.
Exporting data
- Select the Format tab in the Export Options window.
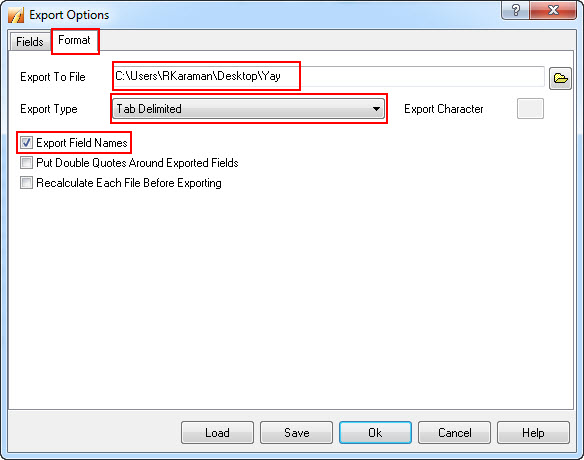
- Select the folder at the end of the Export to File field. A folder explorer window will display.
- Navigate to the location to export the customer data.
- Right-click in the directory. A menu will display.
- Select the New option and Text Document from the subsequent menu. A new .txt document is created.
- Rename the file (for example, Export Data), select it and then click Open. In the field, rename the file extension to .xls (for example,test.txt" is renamed to test.xls).
- Select the down-arrow on the Export Type dropdown menu.
- Select the Tab Delimited option.
- Select the Export Field Names checkbox to activate it.
- Select OK.
- When prompted, answer Yes to the question These options have been changed. Do you wish to save them to a file?
- Select Export to populate the customer data in the new file.
Reviewing the exported data
- Navigate to the saved .xls file.
- Open the Excel document. If a warning window appears, select Yes.
