ProConnect HelpProfile HelpIntuit

Obtain electronic signatures for PDF documents

by Intuit Updated 1 year ago

Electronic signatures now accepted

The CRA has announced that they will be temporarily accepting electronic signatures on T183 for both individual and corporate returns.

ProFile users can collect electronic signatures on the approved forms (such as T183, T183 CORP, and RC59/X authorization) in three steps at no cost:

  1. Generate a password-protected PDF of a T183 (or other equivalent forms) in ProFile.
  2. Email the PDF to their client.
  3. Have their client electronically sign the PDF using Adobe Acrobat Reader or Mac Preview and email it back.

For more information on electronic signatures, review the CRA release.

Mask SIN and Business Numbers when printing forms

In addition to supporting secure transmission of PDFs via password-protected PDFs, ProFile will also be protecting your clients’ sensitive information when printing by masking the first five digits of the Social Insurance number and business number on the following forms:

  • For T1: T183, Authorize a representative (form: AuthorizeRep), Cancel a representative (CancelRep), Business consent authorization request (BusinessConsent), Business consent cancellation request (BusinessCancel).
  • For T2: T183, RC59 EFILE, and RC59X EFILE forms.

Note: This feature is available in ProFile version 2019.4.0 and later.

1. Select the Environment… option from the Options dropdown menu in the top toolbar. The Environment Options window displays.
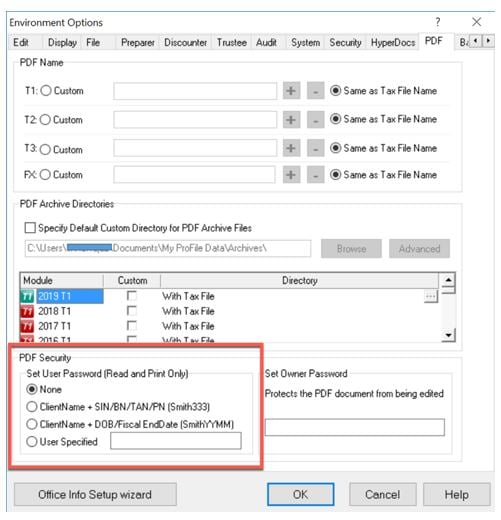
2. Select the PDF tab.

pcg_L3WeaLg5R_1.JPG

3. Under the section PDF Security, go to the Set User Password (Read and Print Only) section and set up a password that your clients will use to read the PDF.

To learn more about setting or configuring a PDF password for documents emailed to clients, review our support article here.

4. Select the OK button when finished. The settings save.
5. Open the T183 form. Review it and ensure it is ready to be signed.
6. Select the Print/Email PDF... option from the File dropdown menu in the top toolbar. Clear any other unwanted form.

Tip: In the Advanced view you can right-click and choose the Clear all option, then select only the T183 to be printed.

7. Select the Build PDF button to save the PDF to your ProFile file directory. Alternatively, if you have Microsoft Outlook set up on the computer, you can also enter the email address and select the Email PDF option to open a new outbound message with the PDF attached.

Note: The password will be case-sensitive. If you have entered the password as all capitalized characters, your client will also have to use the same format.

8. Email the PDF to your client.

Add a signature to T183

There are two methods your client can use to attach their signature to the T183 form:

  • Have your client print the T183, review it, sign Part G, scan it or take a picture, and return the signed form electronically (i.e., email).

or:

  • Use Adobe Acrobat Reader DC, a free software that allows your client to electronically sign the T183 without having to print it.

Using Adobe Acrobat Reader DC to fill and sign a PDF (Windows and Mac PC users)

Download Adobe Acrobat Reader DC. Once you have completed the download and installation process, sign a PDF document.

You can review the Adobe user guide on how to sign a PDF.

Sign and password protect a PDF (Mac PC users)

1. Open the PDF document using Preview.
2. Select the pen icon/Markup Toolbar at the top of the document, then select the Sign icon:

pcg_L3WeaLg5R_1.JPG

3. Use an existing electronic signature or select the Create Signature option to create a new signature.

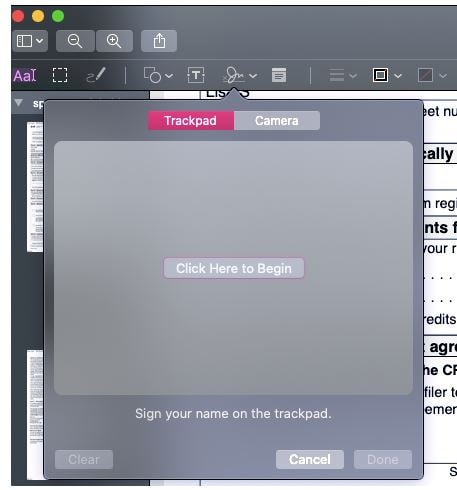
You can use the Trackpad to create a signature. Press the Click Here to Begin option to add a signature. You’ll be prompted to physically sign on the screen to create the signature:

pcg_L3WeaLg5R_2.JPG

You can use the camera feature. Select the Camera option. Sign your name on a piece of white paper and take a photo of the signature/paper.

4. Select Done when finished.
5. Position your signature on the signature line and select File > Save and Encrypt.

Sign and password protect a PDF (iOS and Android Mobile)

For iPhone and iPad

1. Open the iOS Mail app or Adobe.
2. Open the email containing the T183 (PDF attachment) sent by your accountant. 
3. Open the attached PDF.

Note: If the PDF is password protected, contact your accountant to acquire the necessary password.

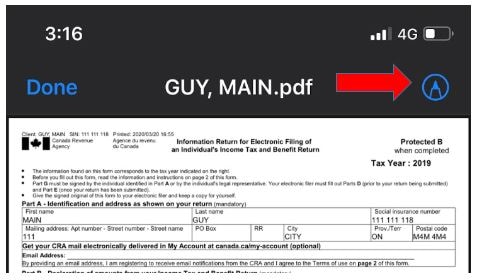
4. Select the markup icon:

pcg_L3WeaLg5R_4.JPG

5. Add a signature or modify the document by tapping the Signature button at the bottom-right corner of your screen.
6. Position your signature and select Done:

pcg_L3WeaLg5R_3.JPG

The mail app automatically creates a reply to the email with the signed PDF attached. 

7. Enter your response message, if desired.
8. Select Send. The signed and password protected PDF is sent to your accountant.

For Android

1. Navigate to the Google Play store.

2. Locate and download the app Adobe Fill & Sign.

3. Open the email containing the T183 (PDF attachment) sent by your accountant.
4. Open the attached PDF using Adobe Fill & Sign.
5. Select the signature button to sign.

Once your PDF has been signed,  password-protect your document prior to emailing it. If your accounting professional already sent a protected document, then skip this step.

Password protected documents will ensure the security of personal identifiable information and aligns with the recommendation of the CRA.

You can review a video of this process below:

1. Open the PDF.
2. Select Protect Using Password. under the File dropdown menu in the top toolbar.
3. Select if you want to set the password for viewing or editing of the PDF.
4. Enter a password and retype it to verify the password.
5. Apply the changes. You can now safely transmit your protected PDF by email.
6. Select the Share button and provide the signed PDF to your accountant.

Intuit ProFile Tax

Sign in now for personalized help

Ask questions, get answers, and join our large community of Profile users.

More like this